

Fly fishing is a great sport but it isn’t always a walk in the park, which is why nymph rigs are incredible assets for when heading out the water. However, with so many to choose from, it can be tough to pick the ones that will work in most conditions. Thankfully, our post is here to point out the best fly fishing kits that will hook everything from brown trout to rainbow trout.

How Do You Choose A Nymph Rig?
There are several features to consider for a high-quality nymph rig. In many ways, it’s a personal choice because every fishing-enthusiast has their own methods. Still, it’s essential to keep the following in mind at all times:
- Weight
- Color
- Seasonal Hatches
- Stealth
- Type of water - tailwaters, freestones, still water, etc.
Taking the above into account should enable you to catch in almost any conditions, as long as you tailor your rigs accordingly.
Of course, there is a lot more that goes into flies for fly fishing. If you're a beginner, it can appear overwhelming, yet you shouldn't let that get in the way of a fantastic experience. In this blog post, we'll outline the flies and kits that make up top-class rigs and how to use them to your advantage. Just continue reading to learn more about the ways you can up your fly fishing game.

Nymph Rigs For Fly Fishing
Basic Two Fly Nymphing Rig
The basic Two Fly Nymphing Rig is my day-to-day go-to nymphing rig. It is easy to set up and is successful in most fly fishing scenarios. This nymphing rig is also easy to learn how to cast and learn how to start judging depth and how your indicator will react when a fish strikes your fly. To set up this rig you will need:

- 9ft 4x leader
- Clear bobber indicator
- Splitshot – 2 to 3 size 4
- Fly #1
- 12” to 14” 5x or 6x Tippet
- Fly #2
This is a great set-up for anyone that is new to fly fishing nymphs, and exploring different nymph rig variations can help build confidence when fishing multiple flies and weighted setups across different water conditions. It is a lot different than just casting one dry fly.

90-Degree Rig
You know you can trust rigs that are designed by experts who regularly find brown and rainbow trout for paying customers. If they don’t, the tours will soon stop making money and have to stop. So, this 90-degree rig is ideal because it’s a modification of a setup used by Matt McCannel, a guide from Ridgway, Colorado.
We use this rig a lot, especially when we see big fish that we don’t want to give a chance to get a sight of us, and it’s highly effective. This is mainly down to the fact that it’s created for waters where the trout are suspicious of free meals and will dart into the weeds and snags if they get a glimpse of an angler. Here’s what you need:

- 2ft to 15ft 0X or 1X leader, or 40lb Mono if you're building your leader
- Clear bobber indicator with a perfection loop
- #14 Swivel
- 6ft to 7ft of 6x or 5x tippet to the first fly. Tie fly on with the Improved Clinch Knot
- Split shot 12" to 16" above the first fly, depending on the depth
- 12" to 14" of 5x or 6x tippet to next fly
- The second fly tied with Non-Slip Loop Knot
Remember that the fish will be around one foot from the bottom of the river when they feed. Therefore, you might have to add extra weight, so you shouldn’t be afraid to play around with the rig as it’s vital to get it through the water quickly. That way, it’ll be in the feeding zone just at the perfect moment - as it crosses the fish’s path.
Before casting, address the target from below and behind the fish to increase your chances of success. You will want to try a couple of practice casts before going live, as the only downside to this rig is the lack of weight. As a result, it can take some getting used to. It's best to aim about ten to fifteen feet above the trout to give the fly time to swing into the feeding zone. But, in fast water, you'll have to adjust and cast even higher up.

Drop-Shot Rig Setup
Whereas the 90-degree rig is excellent for two to ten feet of water, this drop-shot rig is better for deeper runs. After all, sometimes you need more than one fly in multiple positions, and a drop-shot setup can make it happen quite easily since you can fish as many flies as you feel appropriate. It depends on the local laws, too. You will want:

- An 8ft Leader 4x or 5x
- A clear indicator
- Weight on the bottom
- Triple Surgeon’s Knot or Overhand Knot with the tag end as a fly connection
Alternatively, you can set it up as an Overhand Knot by adding a dropper loop. Be sure to keep the flies eight inches to one foot apart if you opt for this method.
For the leader, you might require an even longer rig, depending on the depth. For instance, give yourself twelve feet and 6ft of droppers if you're fishing in twenty feet of water. That way, you'll combine enough lines so that the split shot is bouncing on the bottom as the flies ride above it.

An excellent tip is to vary the color of your fly fishing flies from the top to the bottom. The closer natural flies are to the surface, the shinier they appear due to the sun, whereas they are darker in deeper water. Any rig that doesn’t resemble this won’t appear organic to trout, and they’ll avoid the fly.
Another cool trick is to keep the fly line out of the water where possible as you want a tight connection between your rod tip and the weight. Once you get a bite, the tightness will let you set the hook quickly, reducing the chances of a fish slipping or breaking the hook.
Nymphing Rigs with Dry Flies as Indicator
The next set of Nymphing Rigs utilize Dry Flies, Stimulators and Hopper patterns as your indicator. These types of fly fishing rigs are considered droppers but they utilize nymph patterns under the water as a traditional nymphing rig would be set up.

Basic Hopper Dropper
Newbies avoid grasshopper flies or hoppers because they are more challenging to tie than conventional rigs. It would be best if you mimicked grasshoppers' behaviors, or else the trout will smell a rat and swim away. However, they hatch in their droves during the late summer and early fall, and trout feast on them all day long, making them incredibly useful during these periods.

Thankfully, a basic hopper dropper isn’t rocket science. The main goal is to attach a nine-foot leader with approximately twelve to twenty-four inches of 5x or 6x tippet. Don’t worry - it’s easier than it sounds! Here’s how to do it:
- Make sure the leader is the same size as your rod
- For example, if you have a 10ft rod, get a 10ft leader, or a 9ft leader if you have a 9ft rod, and so on.
- Attach the first fly to the end of the leader. An Improved Clinch Knot is a good bet.
- Add 12" to 24" of 5x or 6x tippet with the Improved Clinch Knot.
- Add a second fly, a smaller one, using the same method as the first fly.
Once everything is tied on, you’ll need a Bead-Headed Nymph pattern for the extra weight. The weight will sink it, allowing you to fish different levels of the column. In this case, it’s two, yet you can add extra Improved Clinch Knots with more hopper flies.
Basic Dry Dropper
An excellent dry dropper will take your fishing game to the next level. Even better, a basic dry dropper uses the same setup as the hopper dropper technique. The only difference is the flies you attach. In this instance, you can swap a wet grasshopper for a dry hopper or fly and increase the number of rainbow trout and brown trout that you catch. When you have that down, you can move onto more complicated rigs.

Free Sliding Dropper
This is challenging as you have to secure two sets of tippets off your dry fly or hopper's hook bend. However, it's not impossible, and you can achieve it by using the following instructions:

- Have the leader the same size as your rod
- Attach the first fly to the end of the leader using the Improved Clinch Knot
- Add 12" to 14" of 5x or 6x tippet with the Improved Clinch Knot.
- Feed an Emerger pattern throughout the tippet
- Add an additional 12" of tippet using the Double Surgeon's Knot.
- Add your weighted Bead-Headed fly to your second tippet.
An indication that you have done it correctly is that your second fly should be able to move freely up and down the first tippet set. Your first fly, the heavier one, should be positioned to the bottom of the rig. This adds stability while allowing the second fly to move and cover a larger surface area of water. Please be careful of tangling your line.
Duncan Loop Dropper
For this rig, you can follow the Free Sliding Dropper setup pretty much all the way to the end. However, when you attach the second fly or hopper using a Duncan Loop Dropper, you must use a Loop Dropper mechanism instead. While they are similar, the tweak to this rig gives the second fly even more mobility. It should move from up and down between your top fly and knot, meaning you can get a better grasp of where the fly or grasshopper will ride in the water. To do this, you should:
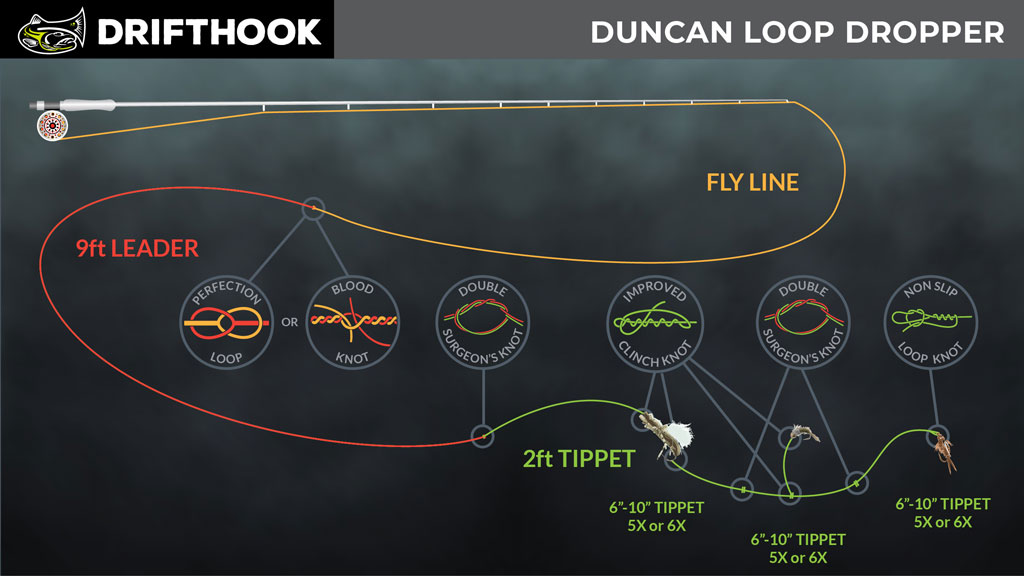
- Attach your fly using an Improved Clinch Knot and 6” to 8” of tippet
- Connect your Free Sliding Dropper using an Improved Clinch Knot
- This goes between your hopper or dry fly and your Double Surgeon's Knot.
A healthy thing to keep in mind is that less is often more when it comes to fly fishing rigs and kits. Therefore, if you think a single fly or grasshopper is enough, please don’t push the boat out. Not only are cluttered setups hard to cast, but they look unnatural in the water and ruin your chances of catching fish.
Upstream With No Indicator
There are several benefits of indicators, the main one being that you can see when a fish has taken the hook, rather than watching the rod tip intently. Still, some instances require no indicator as the splash from the extra weight will scare away trout that only need an excuse to be spooked. As a result, a free line eliminates unnecessary noise and has a more direct connection to the flies.

You can set up a basic fly fishing rig as usual but without the indicator. The trick is to tell when you should use this method because it isn’t always applicable. As a rule, the upstream with no bobber method is perfect for the following conditions:
- Shallow water
- Aggressively feeding fish
- Relatively mild, uniform currents - a flow of water with swirls really requires an indicator to help you out in tricky columns.
It takes some getting used to, yet once you get the hang of it, you’ll love the fact that your leader isn’t tied down by a bobber. Also, it’s great to feel at one with the conditions, rather than leveraging as many high-tech gadgets as you can to catch fish.
Hopper Drooper Nymphing Rigs - What You Need To Know
Tying a hopper rig is only the beginning. For newcomers, they are intimidating as you must consider numerous features before you attach a grasshopper to a hook end. That’s why beginners often steer clear of them. However, you don’t have to if you want to implement them within your fly fishing strategy, not when you know the following.
The Best Conditions For Hopper Fly Fishing Rigs
Like any fly, you need to put a hopper out at the right time in the right conditions. Otherwise, it will stand out like a sore thumb. The first thing to do is check when the grasshoppers on the water are at their most active. Usually, this is mid to late summer and early fall, but it can change depending on the weather. For instance, if the conditions are milder, the season will extend into October and early November.

Windy conditions are beneficial, too. Yes, anglers don’t enjoy it because it makes casting a nightmare. However, it’s important to understand that hoppers don’t enter the water willingly. They are land insects that hate the water, yet they end up in the drink when the wind blows them around. Therefore, the trout are more likely to take the pattern if the water is choppy and resembles typical conditions.

You can be successful in places where there are no grasshoppers, as the fish will react instantly to their favorite meal. Yet, if you're struggling to replicate hoppers' organic movements, you shouldn't be afraid to cast into areas where there are lots on the top of the water. As long as the rainbow trout are biting, they'll happily feed on as many insects as they can fit into their mouths. And, they'll be less suspicious if everything around them appears natural.
In short, you should:
- Use hopper flies during the correct season, usually from the end of the summer to the start of spring.
- Don't be afraid of the wind - the wind blows grasshoppers into the river.
- Cast into areas where there are plenty of hoppers to make your fly appear authentic
- You can also try casting where there aren't any hoppers if your rig is tied well.
What Should You Keep In Mind When Fly Fishing Nymphing Rigs?
Shelf Drop-Offs
As the name suggests, a drop-off is an area of water that suddenly disappears, leaving a shelf. They are perfect for fish because the water is deep, which is great for hiding, and the insects drift down the column right into their mouths. The only problem is getting your nymphs into the feeding zone, as drop-offs can be fifteen feet deep.
The trick is to play around with your rig to get enough weight to sink the fly pattern into the fishes' path. Visualizing how much tippet you'll require is a fantastic place to start as it will give you a solid first impression of the level of drop-off. Of course, when you try something that doesn't work, you should write it down.
Making a note of rigs that didn’t work prevents you from attempting it again with the same result. Once you get used to fishing in drop-off areas, you’ll get better at visualizing and judging the depth and what it takes to appeal to the fish.
Nighttime Vs. Daytime
The daytime is the most common time of day to fish, yet it's often the hardest. This is especially true during the summer when the temperatures rise, and the trout take shelter in cooler, deeper water. However, it's essential to understand they need more oxygen in hot climates, which is when ripple zones come into effect.

If you are motivated enough, the evening - we like to call it the power hour - is a brilliant period to get bites as it’s when the eggs on the water hatch. As a result, rainbow trout and brown trout feed heavily at dusk, increasing your chances of landing a decent-sized fish.
Want to learn how to get started fly fishing at night? Check out this article >
Strike Lightly But Confidently
A bite isn’t a guarantee of landing a fish. To set the hook, you need to strike correctly, which is something anglers often get wrong. Rather than being overly aggressive, you should keep it light and confident. That way, you’ll react accordingly and won’t tear the hook out of the fish’s mouth if you apply too much pressure.
If in doubt, don’t be afraid to strike and see what happens. You might come up empty-handed, yet you could land a trout. You’ll never know unless you react to what’s occurring in front of your eyes.
Need Advice on Nymphing Rigs for Fly Fishing? Drifthook Is Here To Help
At Drifthook, we have lots of informational articles that will improve your fly fishing rigs and setups. Of course, you can shop for kits and accessories through our website. Head to drifthook.com for more information or contact us at info@drifthook.com or (773) FLY-FISH.

About the Author
Matthew Bernhardt, a third-generation Coloradan, grew up at the forefront of the state’s fly-fishing revolution, enjoying time on the water, side by side with experienced guides and lifelong anglers.
By combining his passion for fly-fishing with input from other experienced fly-fishers and guides and his fine arts degree from Colorado State University, Matthew spent five years carefully developing the Drifthook Fly Fishing System, built to help every angler catch more trout.
When he’s not spending time with his wonderful family, you’ll find him out on the water catching MONSTER trout, and he anxiously looks forward to the day when his kids are old enough to join him there.

1 comment
Dave
Just wanted to thank you for sharing your vast knowledge of fly fishing. Your articles and videos are the best to really help the beginner and accomplished angler.
Just wanted to thank you for sharing your vast knowledge of fly fishing. Your articles and videos are the best to really help the beginner and accomplished angler.